Pyrography is the art of crafting intricate designs on wood through woodburning. It is a rewarding artistic endeavor that allows you to express your creativity in a super unique way!
In this guide, you’ll learn about the vital tools, techniques, and tips to help you commence on your pyrography journey.
Whether you’re a beginner or looking to enhance your skills, pyrography will enable you to create stunning pieces that reflect your personal style.
Let’s explore the fundamental aspects of this captivating craft and get your artistic flames ignited!
Choosing the Right Tools for Your Pyrography Journey
The Essential Pyrography Pen
Your pyrography pen acts as an extension of your creativity. You should choose one that feels comfortable in your hand.
Opt for a pen with adjustable temperature settings, giving you the flexibility to create intricate designs or bold strokes.
Brands often provide a variety of options to suit both beginners and seasoned artists, ensuring you can find a tool that meets your specific needs.
Types of Woodburning Tips: Which to Select?
Selecting the right woodburning tips significantly impacts your pyrography results.
Tips come in various shapes and sizes, each producing different textures and line qualities.
Common styles include fine points for detailed work, flat tips for shading, and loop tips for creating unique patterns.
Once you understand each tip’s function, you will be able to diversify your technique and enhances your overall artistic expression.
- Fine Point: Great for detailed work.
- Flat Tip: Ideal for shading and broad lines.
- Loop Tip: Creates interesting patterns.
- Writing Tip: Perfect for cursive and letter art.
- Specialty Tips: For unique designs and effects.
| Tip Type | Function |
| Fine Point | Perfect for intricate and detailed designs |
| Flat Tip | Ideal for shading and wider strokes |
| Loop Tip | Used for creating various patterns |
| Writing Tip | Designed for calligraphy and lettering |
| Specialty Tips | Used for unique textures or effects |
You will want to pick the right tip for achieving the desired artistic effect.
Fine point tips are ideal for detailed work and can produce sharp, precise lines.
Alternatively, flat tips allow more spacious shading that gives depth to your pieces.
Loop tips can also add a unique twist to your designs, perfect for experimenting with patterns.
With such a diverse range available, familiarize yourself with each tip’s capability to enhance your skills over time.
- Experimenting with different tips can expand your creative options.
- Always have a few varieties on hand for different projects.
- Practice each tip on scrap wood to understand their effects.
- Explore specialty tips for unique effects and styles.
- Discover personal preferences as you gain experience.
The Importance of Wood Selection: Best Woods for Beginners
Your choice of wood directly influences the quality of your pyrography work.
I recommend beginners start with common options like basswood, birch, and poplar.
These woods burn easily, providing excellent contrast for your designs and minimizing the risk of uneven burns.
Each wood type has unique characteristics, so it’s beneficial to experiment with them to find your favorite.
Wood selection goes beyond ease of burning. It also affects the overall finish and your artistic expression.
Basswood is praised for its smooth surface and light color, making it ideal for detailed work.
Birch offers a fine grain with a warm tone, while poplar is recognized for its affordability and ease of manipulation.
As you refine your skills, testing different woods will help you discover which best suits your unique style and technique.
Mastering Woodburning Techniques: From Basics to Advanced
Getting Comfortable with Your Pen: Grip and Pressure
Establishing a comfortable grip on your woodburning pen is a foundational element of successful pyrography.
Your fingers should encircle the barrel evenly, providing both control and ease of movement.
Experiment with pressure as well. You’ll find that consistent pressure leads to smoother lines, while varying your grip may allow for more expressive marks and textures.
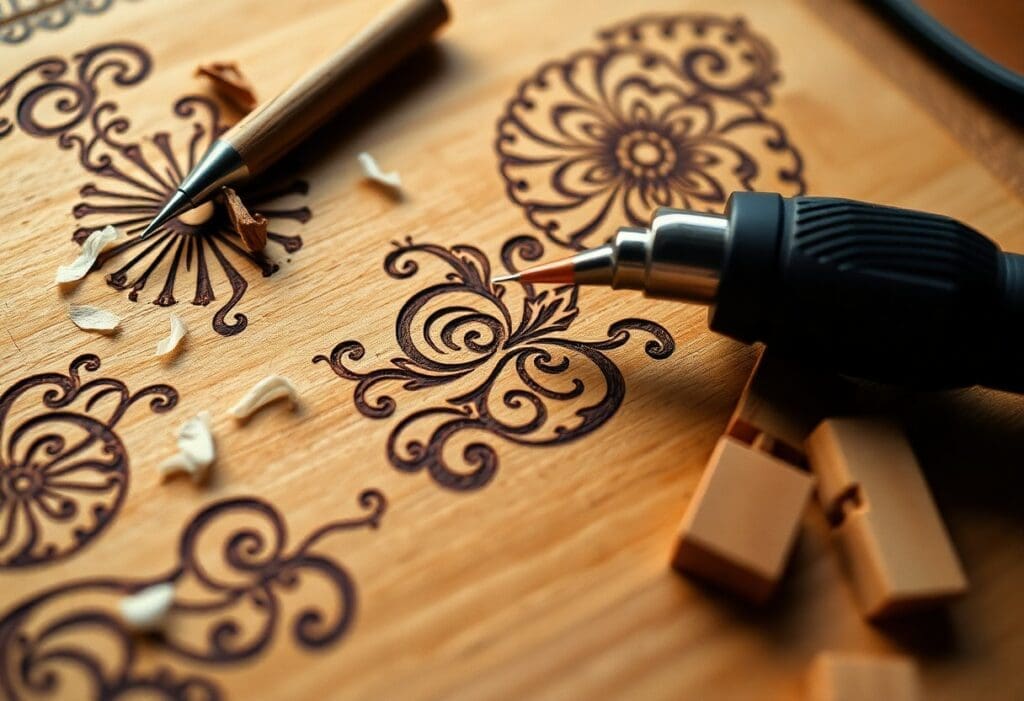
Line Work and Shading Techniques: The Building Blocks of Pyrography
Line work and shading form the core skills for any pyrographer.
Try using different tips for your pen. this will help you create a variety of lines, from thin, delicate strokes to broader, bolder ones.
Shading involves layering your burns. This means gradually building depth through soft, controlled pressure and the right angle of the tip.
In pyrography, successful line work begins with the ability to control your pen’s movement.
You may choose to practice straight lines, curves, and intricate patterns on scrap wood.
You can master shading by gradually increasing the burn time or distance from the wood’s surface.
This will enable you to create those subtle gradients that bring dimension to your piece.
By transitioning between various tips, like the shader for patterns and the detail tip for fine lines, you can unlock an expansive range of textures and depth.
This development will ultimately lend your artwork much-needed character.
Creating Depth: Layering and Blending Techniques
Layering and blending are techniques that give your work a three-dimensional quality.
These methods involve building upon your initial lines and shading gradually, allowing you to control the depth of your burns effectively.
You can use a blending tool or even a soft cloth to transition your shades, smoothing out any harsh lines.
By layering multiple burns, you create depth and interest in your artwork.
In fact, you can transform a flat image into a dynamic one by enhancing areas of shadow and/or light.
The key is to work in small increments, carefully evaluating your progress after each layer is added.
Your blending will become particularly effective when you master the technique of scorching lighter areas adjacent to darker ones.
This allows for a seamless transition that engages the viewer’s eye, making your design come to life as it intertwines line and shadow intricately.
The Art of Design: Transforming Ideas into Woodburning Projects
Finding Inspiration: Resources for Design Ideas
Exploring various resources can spark your creativity and fuel your design ideas.
Websites like Pinterest or Instagram are treasure troves of visual inspiration. They both showcase a range of styles from intricate patterns to minimalist concepts.
Art books and online galleries can provide historical context and a diverse array of artistic expressions.
Alternatively, nature can serve as a beautiful muse with its complexities and organic forms.
The Sketching Process: Transferring Designs to Wood
To really bring your ideas to life, you’ll need to practice careful sketching, which you can then transfer onto the wood surface.
You might start by sketching on paper, experimenting with sizes and details before moving to the wood.
Once you’re satisfied with your design, you can use transfer paper or freehand it directly onto the wood.
This will ensure that it’s positioned just right for your intended pyrography project.
This process is not only important for accuracy but also serves as a moment to refine your artwork concept.
Use light pencil marks to help guide your burn. You can erase or adjust as needed before committing with the pyrography pen.
For larger pieces, consider outlining more prominent features first and then filling in the finer details, allowing for a clearer vision as you burn.
You may also want to practice your designs on scrap wood to become familiar with the pen’s movement and texture.
Preparing Your Wood: Smoothing and Treatment Tips
Before stepping into the woodburning process, you’ll need to properly prepare the surface.
Try smoothing the wood, to ensure that your designs translate well.
Consider sanding the surface with fine-grit sandpaper to eliminate any rough spots, because this will facilitate a cleaner burn.
After sanding, wipe the wood with a damp cloth to remove dust particles, ensuring your designs come out crisp and clear.
- Select wood types that are less resinous, such as basswood or birch, for a smoother burn.
- Test your pen temperatures on scrap pieces for a better feel before starting your main piece.
- Apply wood conditioner for an even burn and to reduce the risk of dark spots.
Pay attention to these preparation steps, and you’ll enjoy more satisfying and predictable results. By taking the time to prepare, you’ll enhance the overall quality of your artwork, allowing for a stunning finish on your wooden canvas.
Safety Practices for a Successful Woodburning Experience
Essential Workspace Safety Measures
Creating a safe workspace is your first step toward an enjoyable woodburning session.
Ensure that your workspace is clutter-free, well-lit, and equipped with a sturdy surface to work on.
Always keep flammable materials, such as paper or fabric, away from your work area to minimize the risk of accidental fires.
Consider using a heat-resistant mat beneath your project to protect surfaces and maintain a safe environment while you burn.
Managing Fumes and Ventilation
Proper ventilation is necessary to protect your health during woodburning.
Always work in a space with adequate airflow to avoid inhaling harmful fumes that can be released from burning wood and other materials.
Set up fans to circulate air or consider working outdoors for a safer experience.
The type of wood you choose can also impact the fumes emitted during the burning process.
Hardwoods like oak and maple produce less smoke than softwoods such as pine, which can release more sap and create unpleasant fumes.
Consider using a fume extractor or air purifier in your workspace to filter out potentially harmful particles, ensuring that you breathe fresher air while pursuing your craft.
Handling Tools Safely: Preventing Injuries
Woodburning tools carry the risk of burns and other injuries, so always practice safe handling.
Ideally, you’ll treat your pyrography pen as a hot tool. Never leave it unattended while plugged in, and ensure it cools down completely before storing it.
Use tools designed for comfortable grip and practice caution during intricate work to avoid slips.
Each pyrography tool comes with specific instructions for safe usage; adhering to these guidelines will enhance your overall safety.
Keep your tools organized to prevent accidental burns or injuries.
Store them in a designated area when not in use, and avoid wearing loose clothing that could catch on the tools.
When you take a disciplined approach, you’ll be able to dive deeply into your artistry while keeping safety front and center.
Finishing Touches: Preserving Your Woodburning Artwork
Sealing Techniques to Enhance Durability
Apply a coat of clear varnish, polyurethane, or wood sealer to protect your woodburning from moisture, dust, and UV damage.
You can create a barrier that keeps your artwork looking vibrant for years by spraying or brushing these finishes on manually.
Always allow adequate drying time and follow the manufacturer’s instructions for the best results.
The Best Finishes for Wood: Enhancing Color and Grain
Choosing the right finish can elevate the visual appeal of your woodburning piece.
For a natural look, oils such as Danish oil or tung oil penetrate the wood, enriching its grain while offering protection.
Alternatively, water-based finishes dry quickly and provide a clear, durable coat that doesn’t yellow over time, making them ideal for colored designs.
I encourage you to explore finishes like shellac. It can add a subtle warmth and luster to your artwork, highlighting intricate details without overpowering the original piece.
If you’re looking to enhance the color, consider applying a wood stain before sealing, ensuring that your designs pop.
Always test on a scrap piece of wood to achieve the desired effect.
Maintenance Tips for Long-lasting Creations
Regularly dust your woodburning with a soft, dry cloth to keep it looking fresh.
Avoid direct sunlight exposure and extreme humidity, which can warp or fade the wood.
For a deeper clean, a lightly dampened cloth works wonders, but be careful not to soak the wood.
- Avoid using harsh chemicals that could damage your artwork
- Store pieces in a stable environment away from heat sources
Be sure to integrate routine maintenance into your care habits. These simple actions will help preserve the integrity and appearance of your artwork for many years to come.
Considering factors like temperature and humidity is necessary to maintaining the beauty of your work.
I recommend keeping your piece in a protective frame, which can also guard against scratches and dust accumulation.
Always display your woodburning creations thoughtfully to ensure they enjoyed and preserved.
- Avoid excessive touching of the surface to minimize oils from your skin.
- Use glass or acrylic for artwork displays to protect against dust.
When you take these steps to maintain your artisanal creations, your hard work can be appreciated for generations.
Navigating Common Pitfalls: Learning from Mistakes
Identifying and Correcting Burn Marks
Burn marks can be an unwelcome surprise on your project, appearing as dark spots or lines that mar your artwork.
To correct these, assess the severity of the marks first.
For minor burns, a fine-grain sandpaper can gently buff away the discoloration without damaging your wood.
If the burn is deeper, you might consider using a wood filler to smoothly level the surface and then reapply the wood finish for a consistent look.
Practice self-compassion; even experienced artists encounter these hiccups.
Fixing Smudges and Uneven Lines: Quick Solutions
Smudges and uneven lines can disrupt the flow of your woodburning art.
One immediate solution is to use a clean, dry brush or cloth to remove surface smudges before they set in.
For uneven lines, revisit your strokes with a lighter touch. This will help smooth out any harsh edges.
It’s all about finding your rhythm. Sometimes those uneven lines can blend into something organic and beautiful.
Going beyond quick fixes, check your tool settings and practice with varying pressure on scrap wood pieces.
Experimenting will help align your technique with the desired consistency of lines.
Another approach is to introduce additional details.
By incorporating fine dots or shading, you can camouflage imperfections and create depth in your piece. This is a nice way to make those little errors seem intentional and part of your artistic journey.
Confidence in correcting flaws comes with practice and experimentation.
Knowing When to Start Over: A Guide to Resilience
Starting over can feel daunting, especially after investing time in a piece. However, many find it liberating when they recognize that a project simply can’t be salvaged.
Take a step back and evaluate the overall composition. If flaws overpower the intended design, it may be time to embrace a blank slate.
This reset offers valuable lessons and fresh creative possibilities.
Understanding when to start anew is necessary for growth as an artist. Reflecting on what didn’t work can provide insights that improve future projects.
Keep a sketchbook handy for jotting down ideas or practicing techniques outside of your main pieces. This way, you maintain creative momentum even when resetting.
Embrace the learning process. It will ultimately reinforce resilience and lead to a stronger artistic voice.
Community and Resources: Where to Find Support as a Woodburner
Online Communities and Forums for Pyrography Enthusiasts
Engaging with online communities is an excellent way to connect with fellow woodburners and gain insights.
Platforms like Facebook host dedicated groups where members share their projects, tips, and experiences.
Websites like Reddit feature active threads focused on pyrography, discussing everything from tools to techniques.
By participating in these forums, you can ask questions, seek feedback on your work, and stay motivated by seeing others’ accomplishments.
Workshops and Classes: Advancing Your Skills Together
Participating in workshops and classes allows you to refine your skills while learning alongside others.
Many local craft stores, community colleges, and art studios offer classes that cater to different skill levels, providing a more hands-on approach to developing your artistry.
Seeking out workshops can significantly enhance your woodburning journey.
In-person classes provide the advantage of immediate feedback from instructors, while the collaborative environment helps foster creativity and camaraderie among students.
If you prefer a more flexible option, look for online workshops that you can attend from the comfort of your home. These often feature live demonstrations and interactive Q&A sessions with experienced pyrotechnists.
Recommended Books and Websites for Further Learning
To expand your knowledge and inspire new techniques, I recommend you explore both books as well as pyrography-focused websites.
Titles such as “The Ultimate Guide to Pyrography” and “Pyrography Workbook” are excellent resources that provide both beginner insights and advanced tips.
Websites like Pyrography Made Easy feature tutorials and project ideas that cater to all skill levels, keeping your creative juices flowing.
Investing in quality learning materials can transform your woodburning experience.
Books often include detailed instructions, photographs, and illustrations that make concepts easy to grasp.
Websites frequently offer diverse content, from videos to forums. On them, you’ll be able to engage with the pyrography community while discovering new tools and projects.
These resources foster continuous learning and motivate you to push the boundaries of your skills.
The Evolution of Your Pyrography Style: Embracing Change
Experimenting with Different Techniques and Mediums
Trying out various techniques and mediums can dramatically influence your woodburning practice.
From employing shading methods like stippling or cross-hatching to integrating color with acrylic washes, each new approach opens up diverse avenues for creativity.
Don’t shy away from exploring unconventional surfaces such as leather or fabric, as they offer unique challenges and rewarding outcomes.
This experimentation not only enhances your skill set but also keeps your inspiration flowing and helps evolve your overall style.
Developing Your Unique Artistic Voice in Pyrography
Your unique artistic voice emerges from the synthesis of personal experiences, interests, and the techniques you’ve mastered over time.
Explore themes and motifs that resonate deeply with you. This will allow your art to reflect who you are, while distinct techniques can further enhance that personal touch.
Embrace imperfections and learn from them, as these elements can add character and authenticity to your work.
Over time, this process helps you to hone your style into a recognizable signature that sets your work apart from others.
Find inspiration in nature, emotions, or even everyday objects. Then, consider how you can express these themes through your pyrography.
By diving into different subjects, you can create pieces that carry personal significance. This will, in turn, make your art more meaningful and relatable.
And by weaving in a mix of styles and techniques as you progress, you will ensure that your artistic voice remains dynamic and continues to evolve.
Plus, it should capture and reflect the essence of your longer artistic journey as well!
Tracking Your Progress: Keeping a Woodburning Journal
I highly recommend documenting your woodburning journey in a journal.
This would not only serve as an invaluable tool for tracking progress, but also for refining your skills.
Jot down details about each project, including materials used, techniques applied, and the challenges faced.
Regularly review your entries to reveal patterns of growth and areas needing focus.
A woodburning journal is more than just a record of your work. It’s a space to capture inspirations, ideas, and reflections.
Sketch out concepts for future projects, paste images of pieces you admire, or note thoughts on techniques you’d like to experiment with.
This reflective practice not only helps you identify what resonates with you but also motivates your creative journey.
Regular check-ins with your journal can reignite your passion and remind you of how far you’ve come, propelling you toward even greater artistic accomplishments.
Conclusion
Now that you’ve taken a deep dive on pyrography, it’s time to get started on your own.
By selecting the right tools, practicing key techniques, and exploring various designs, you can transform simple wood pieces into intricate works of art.
Embrace your creativity and don’t hesitate to experiment with different styles and materials.
With dedication and practice, you will develop your skills and create stunning pieces that reflect your unique artistic vision.
Start your woodburning journey today and enjoy the satisfying experience of bringing your ideas to life.