Cross stitch is a delightful and relaxing craft that anyone can enjoy, and getting started is easier than you might think!
In this post, you’ll learn how to start a cross stitch pattern step by step, from selecting the perfect materials to executing your first stitches.
With just a bit of patience and practice, you’ll be able to create beautiful patterns that you can proudly display or gift to loved ones.
So, grab your supplies, and let’s dive right into the colorful world of cross stitching!
Choosing Your Pattern
As you commence on your cross stitch journey, you will need to select the right pattern. You want a design that resonates with your interests while also fitting your current skill set.
Whether you prefer floral designs, animals, or quotes, the choices are endless.
Explore various sources, including books, online resources, Amazon, and crafting communities, for inspiration to guide your choice. Pick a pattern you truly love. It will keep you motivated!
Finding Inspiration
After exploring different mediums, you’ll find a treasure trove of cross stitch patterns waiting for you.
Look through crafting websites, social media platforms, and local craft shops, as they often showcase popular designs.
Don’t hesitate to join crafting forums or local groups—these communities can provide fresh ideas and invaluable tips.
With so many options, you’re sure to discover a pattern that speaks to you.
Deciding on Complexity
Your skill level should guide your choice of pattern complexity.
Assess your own abilities honestly. If you are just starting, pick simpler designs that will help you build confidence and technique.
As you gain experience, you can gradually challenge yourself with more intricate patterns that allow your skills to flourish.
Even as you seek out new patterns, it’s always smart to start with projects that are manageable. You’ll find that working on simpler pieces first can be incredibly rewarding.
This approach helps you master the basics while reducing frustration and increasing your enjoyment of the craft.
As your skills grow, don’t hesitate to tackle more complex designs, allowing you to stretch your creativity and hone your technique.
Gather Your Materials
One of the first steps to start your cross stitch journey is gathering all necessary materials. Having everything on hand will make your crafting experience smoother and more enjoyable.
First, choose a suitable workspace and designate a spot where you can comfortably stitch. Then, ensure you have your important supplies ready to go!
Essential Supplies
You will need some key tools: fabric, embroidery thread, needles, and a hoop.
Select high-quality supplies, which will improve your stitching experience significantly.
Be sure to choose the right fabric, because it can affect the final look of your project. You can find some stellar options via the link I include above.
Optional Accessories
Below, consider adding optional accessories to enhance your stitching process. Items like thread organizers, small scissors, and pattern holders can make your crafting both easier and more enjoyable.
Ultimately, choose accessories that suit your style. It will make your cross stitching more fun.
But as you explore these optional accessories, think about what would truly benefit your stitching experience. For example, a thread organizer can keep your workspace tidy, while sharp scissors can help with precision cutting.
By selecting the right accessories, you can turn a good hobby into a great one!
Preparing Your Fabric
Now that you’re excited to start your cross stitch journey, it’s time to prepare your fabric. Choosing the right fabric will set the foundation for your stitching experience.
Whether you opt for Aida or linen, ensure it complements your pattern and skill level.
The fabric’s count, or the number of threads per inch, can greatly influence how easy it is for you to stitch, so pick wisely!
Choose the Right Fabric
At this stage, you should explore the different types of fabrics, such as Aida, known for its easy grid layout, and linen, which offers a more textured surface.
For beginners, a lower count Aida (like 14 or 16) is ideal. More experienced stitchers may prefer the elegance of higher count linen.
Your choice will impact your overall experience, so select what feels right for you.
Prepare Your Fabric
Before you start stitching, take the time to properly prepare your fabric. Wash it gently to remove any chemicals, then cut it to size, allowing extra margins on all sides.
Hooping your fabric helps keep it taut, making your stitching much easier. An organized workspace will also go a long way in keeping your project enjoyable and stress-free!
Plus, when washing your fabric, consider using a gentle detergent to maintain its quality. After cutting, make sure to leave enough space around your design for framing or finishing later on.
These simple steps will ensure your fabric is not only ready for stitching but also that your cross stitch project runs smoothly from start to finish!
Setting Up Your Workspace
After you’ve gathered your materials, it’s time to set up your workspace. A dedicated area for cross stitch allows you to focus and enjoy your crafting time.
Make sure you have a sturdy table or lap desk and plenty of light to see your patterns clearly.
Don’t forget to include a comfortable chair that supports you well during long stitching sessions. By choosing the right space, you’ll almost surely enhance your creativity!
Create a Comfortable Space
Space is important for a pleasant crafting experience.
Create a cozy and well-lit area that inspires you to stitch. Comfortable seating and easy access to all your materials enhance your enjoyment and efficiency.
You’ll find that a relaxed environment allows your creativity to flow more freely while you work on your patterns.
Organize Your Supplies
By establishing an efficient system for organizing your threads, patterns, and tools, you ensure a smooth crafting experience. Consider using boxes or carts to keep everything neat and accessible.
This way, you can easily grab what you need without unnecessary interruptions.
Considering how you set up your supply organization will save you time and frustration in the long run.
You might separate your threads by color or type, and make sure your scissors, needles, and hoops are always within reach.
Having everything neatly arranged not only looks inviting but also keeps your focus on your cross stitch project.
If you want to make this easy and quick, pick up a cross stitch / embroidery organizing kit on Amazon.
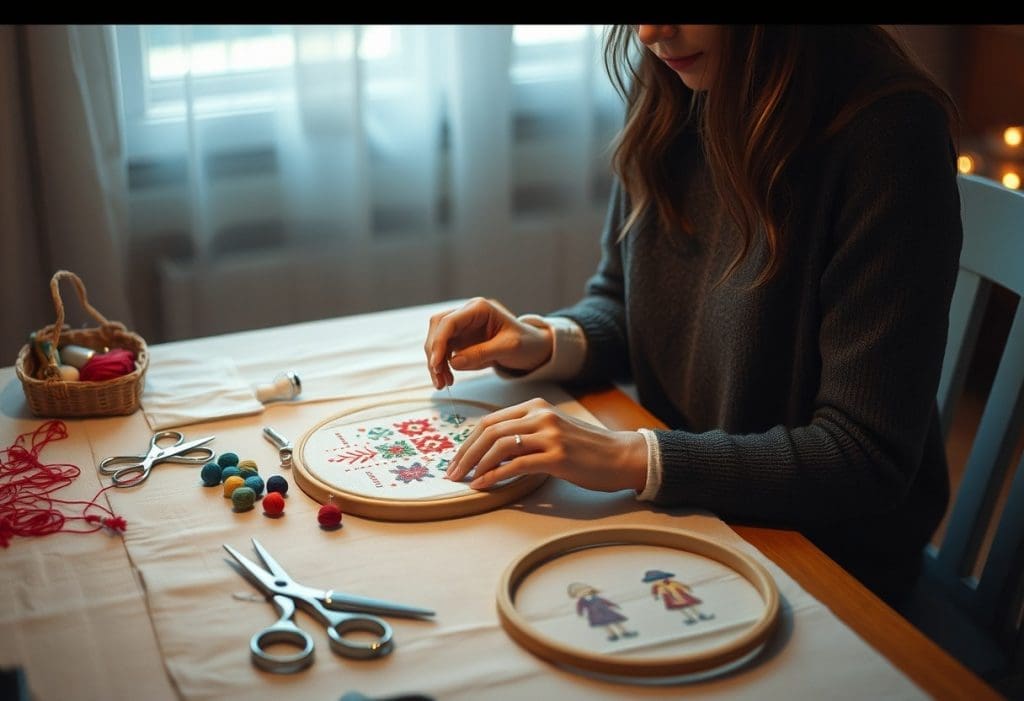
Starting Your Cross Stitch
Unlike many crafts, starting your cross stitch pattern can be both simple and exciting.
Gather all your supplies, such as fabric, thread, and a needle, and find a comfortable space to begin your stitching journey.
Make sure to choose a pattern that suits your skill level – it’s best to start with something manageable to build your confidence!
Threading the Needle
Stitch your needle with care by following the proper technique for threading.
Take your time with this initial step, as practice enhances your skill.
Use a pair of scissors to cleanly cut the thread for a smoother threading experience.
Keep in mind that choosing the right length of thread can prevent excessive tangling.
Following the Pattern
At first glance, cross stitch patterns may seem daunting, but getting familiar with the symbols and color codes will help you stitch accurately.
Ensure your pattern remains visible while you work to avoid confusion. This is especially important if you are using one of the counted cross stitch kits.
Considering the layout of your pattern is necessary for a successful project. Take a moment to plan your starting point and work systematically from there.
Organize your thread by color. It can also save time and reduce frustration.
Start by determining whether you want to grid your fabric, because it can aid in keeping your stitches precise.
Troubleshooting Common Issues
Despite the best plans, you may encounter common issues while cross stitching. Know how to troubleshoot going it, so you can overcome challenges and enjoy your stitching experience.
Stay calm and have strategies in mind in advance. This can transform potential frustrations into learning moments, allowing you to grow as a stitcher.
Dealing with Mistakes
Mistakes can be challenging, but you’ll need to understand how to spot and fix common stitching errors. This will keep you motivated and avoid you being deflated when issues arise.
Embrace mistakes as part of the learning process while you stitch. They will often lead to unexpected creativity and growth. You always have the option to start fresh if needed.
Maintaining Consistency
Maintaining consistency in your stitches is key to achieving a polished finish. Follow tips for keeping your stitches even and tight, and regularly check your progress against the pattern to ensure you’re on track.
It’s often helpful to use a stitch guide for reference.
Behind each perfect piece lies the practice of maintaining consistency.
Regularly adjust your tension and align your thread. This will significantly impact the final look of your work.
In fact, your stitching uniformity is highly dependent on choosing the right fabric.
Even the most seasoned stitchers face the challenge of consistency at times.
By being mindful of your technique and establishing a routine, you can ensure that your work remains neat and aligned. It’s beneficial to create a stitch plan before starting a new project.
Conclusion: How to Start a Cross Stitch Pattern Step By Step
With these considerations in mind, you’re well on your way to starting your own cross stitch pattern!
Take your time to choose the right materials, select a design that excites you, and follow the step-by-step process to bring your vision to life.
Enjoy the journey of creating something beautiful, and don’t hesitate to let your creativity shine as you stitch your unique masterpiece. Happy stitching!